Alexa devices support a large array of different languages but your skill needs to be updated to handle this. There are 2 parts to adding an additional language to your skill – the interaction model and the code. Adding support for an additional language for your skill is quite simple but there are several options you can choose that will make your life easier in managing your skill. In this article we will see how to add support for different languages, and also how to determine which language was used in making a request.
Detecting the Language
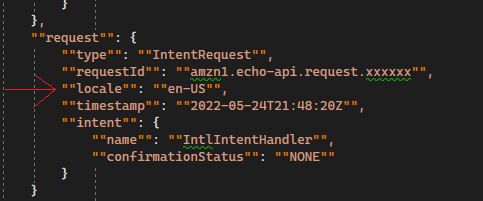
Before we add a new language, let’s see how to detect the language the user spoke when they made their request. If you look at the incoming JSON for any intent request, you will see the “request” node and inside that is the “locale” node. This tells you the language the user spoke in when they made their request, in this case English from the U. S.
Note there is nothing requiring you to reply in that same language – technically you can answer in any language you want. However, you can image how poorly your skill will be viewed if the user asks for something in Italian and you answer in English.
So now we can tell what language was used, but we still haven’t told AWS that we want to accept additional languages.
Adding a Language
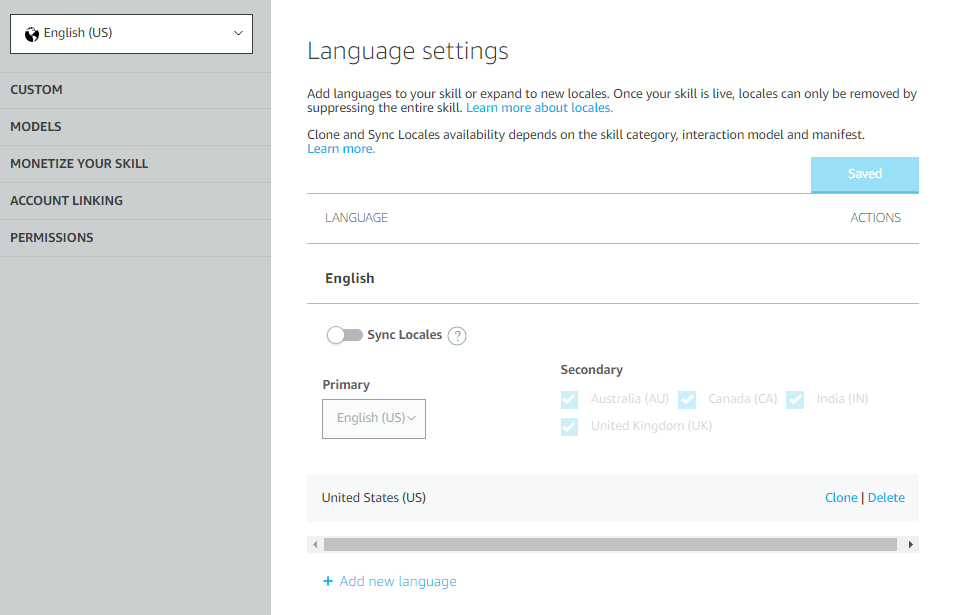
Adding support for a new language starts with updating the skill configuration. Open the Alexa Developer Console and navigate to the skill you want to edit. In the top left corner you will see a Select box. Drop that down and select Language Settings. That should take you to the screen shown on the right.
Click the “Add new language” button on the bottom left and choose Italian, then hit Save. Your skill can now accept requests in Italian. This obviously doesn’t mean your code is ready to accept Italian requests, but you have just told the Amazon speech recognition system that your skill is allowed to accept requests in Italian.
Interaction Models
If you are going to support different languages in your skill you will need to maintain a different interaction model for each language. This makes sense since the invocation language and sample phrases will all be different when working with a different language. This also adds to the complication, though, because you must maintain each interaction model by hand.
If you navigate back to the interaction model definition screen (Build -> Interaction Model -> JSON Editor) you will see in the top left corner that you can now select English and Italian. Let’s say we want to change the invocationName of our skill. We must now do that in both the English and Italian interaction models. Each requires the same process of Save and Build Model before that interaction model becomes active. Take care when updating interaction models with multiple languages because it is easy for them to get out of sync.
While editing your model you will probably need to add special characters to the invocations or sample phrases. A standard serializer will change any characters into the escaped code version of that character. For example the Spanish letter o with an accent is serialized as \u00F3. You can type these characters into your interaction model as the special code, but once you save the model you will see the real character in the string.
Supporting Dialects
In the image above where we show the incoming JSON request it shows the user spoke in English. If they spoke in Italian you would get a locale of “it-IT”. The first 2 letters of the locale code is the language spoken, and the last 2 letters are what country the language is from. For Italian the country in “it-IT” is not significant because the only dialect of Italian that is supported comes from Italy. However, what happens when there are different dialects of a language, such as English or Spanish?
When you added the Italian language you may have noticed that there were many other languages available, and some had multiple versions. For example English has English (AU), English (CA), English (IN), English (UK), and English (US). These are different dialects of the language and your skill can support each one individually or all together.

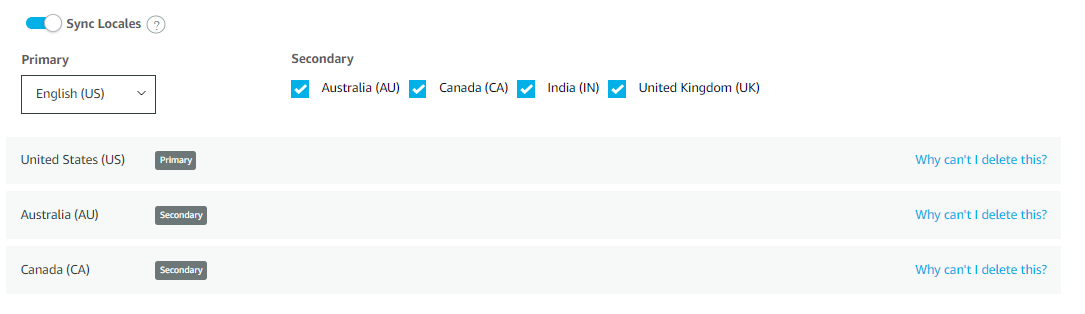
To see the difference in these, let’s add English (AU) and English (CA) to our skill. Once you do so (and save) you will see the additional languages, but you will also see a Sync Locales switch and some check boxes under a Secondary heading. Turn on the Sync Locales switch and you will see the image on the right.
What we have done is made English US our Primary English language while English AU and English CA are now Secondary. This means when you update the interaction model of the English US language, all the other English interaction models will be synchronized to be the same.
You can try this yourself. Navigate back to the JSON editor for the interaction model and in the upper left corner choose English US (the primary dialect). Make a change in the interaction model and press Save. You should see a message in the bottom right that says “Skill Saved Successfully”.
Now press the Build Model button. When you save and build the model you will eventually see a “Build Completed” (after the “Quick Build Successful”) message appear in the bottom right. This is when the Primary language has finished building. You will then see “Sync Locales Started” message indicating the interaction model has been copied to the other locales for the same language. Shortly you will see additional “Build Completed” messages as each additional locale is built.
Tweaking a Dialect
Keep in mind that each dialect is considered a completely separate interaction model. The Developer Console just does some of the grunt work for you by copying the JSON and rebuilding. If you want to change all the interaction models at once then change the Primary and all will be changed.
However, say you want to tweak the interaction model for one dialect to add support for some local terms, but the majority of the model is the same and you don’t want to maintain two completely separate models. Once the Primary model is updated, saved, copied to the Secondary models, and built, then you can tweak one of the other dialects by itself by editing just that one locale. This will only change the single dialect, not the Primary or any of the Secondary ones. You will have to do another build for the one dialect but that is all.
Testing Multilanguage Skills
Testing multilanguage skills in the Developer Console can be a long process. You need to set the proper language in the top left corner of the screen, then test your interactions using the selected language. It makes for a large QA load to do the testing but it is worth it to maintain the quality of your skill.
Leave A Comment