How to Setup Postman to work with QuickBooks
It is possible to use Postman to make queries to the Intuit QuickBooks API, but it takes a bit of configuration work.
Intuit Security Overview
Security plays such an important role in getting Postman (or any QuickBooks app) running, that we should go over the basics before we get started. There are several steps you need to take to get the permissions you need, but for clarity it’s easier to describe them in reverse order.
All API calls, whether they come from Postman or an application, must have an Access Token attached to the request. An Access Token is like a short lived (60 minutes) password that grants you access to the company information. Without a valid Access Token all your requests will be denied.
To get an Access Token you need to first get an Authorization Code and a Realm ID. (It’s easy to confuse an Access Token and an Authorization Code so if you are having trouble with API calls make sure you are sending the proper one)
The Realm ID is a long number that identifies the company you are working with. It is specified as a number in the JSON, not a string, and so is represented as a C# “long”.
The Authorization Code is an encrypted amalgamation of several pieces of information, including the Client ID, Client Secret, and the type of information you are requesting, which is called the Scope. It describes who you are and what permissions you have requested but does not grant those permissions (that is the function of the Access Token). It is only used once when requesting an Access Token, so the lifetime of an Authorization Code is only 5 minutes.
To get an Authorization Code you need to have your Client ID, Client Secret, and a special string describing the permissions you are requesting (the Scope). These you can find in the Intuit OAuth Playground.
So the authorization process goes like this
- Use the Client ID, Client Secret, and Scope to get an Authorization Code.
- Use the Authorization Code and Realm ID to get an Access Token
- Send the Access Token with each API call to gain access to the information you want.
Since the Access Token expires in 60 minutes. there must be a convenient way of getting a new one. That is where the Refresh Token comes in. When you get your first Access Token you are also sent a Refresh Token. By calling an API endpoint with the expired Access Token and the Refresh Token you will receive a new Access Token and a new Refresh Token. The Refresh Token is good for 100 days. but can change frequently.
Theoretically you only need to get an Authorization Code once, then use that to get an Access Token and Refresh Token, and just continually refresh your Access Token every 60 minutes.
Create a New App and Sandbox Company
The first thing we need to do is create the app we will use to connect to QuickBooks. This is a simple process that does not require you to have a paid account. If you’ve not done this before and need a little help, check out my step by step tutorial on creating QuickBooks Apps.
It’s not wise to use a real QuickBooks company to test with, so you may want to create a new company. This is also fairly easy to do by following the directions here.
Get Intuit Authorization Code
There are 2 steps to getting access to a site using OAuth. First you get an Authorization Code which encapsulates your requested data scope. Then you trade an Authorization Code for an Access Token and Refresh Token. The easiest and fastest way to get this configured via Postman is to get the Authorization Code from the Intuit OAuth Playground.
First select the app you have already created, the Client ID and Client Secret will be added to the text boxes for you. Choose the proper scope (probably com.intuit.quickbooks.accounting) and press Get Authorization Code.
You may be prompted by Intuit to verify you want to connect your app to the QuickBooks instance.
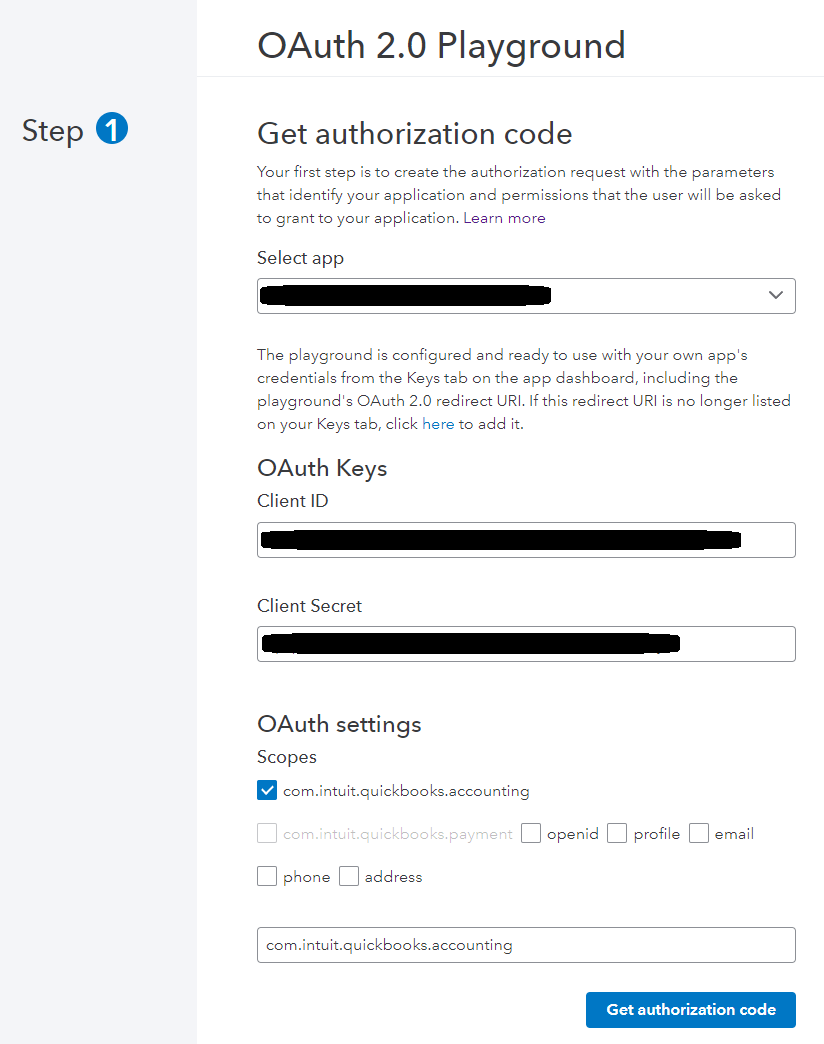
The Authorization Code will expire in 5 minutes because it’s really only used to get the Access Token. If you’re not fast enough setting up the remaining Postman settings, you can always come back and generate a new Authorization Code.

Get Current API URIs
We will need the current Intuit URIs to submit our requests to. These are listed in a public Json feed. Note there are two sets, one for the sand box you can access here , and one for production which is here. These URIs are the same for all applications.

Get Current API Version
Your app will be assigned an API version to use, which you must specify when calling the API. You can find that in the API Explorer here at the top of the page (you must first sign in to get the current API version assigned to you).
The examples published by Intuit are quite old, referencing version 14 in some cases. Though the differences in the APIs are typically small, the versions change frequently so make sure you’ve chosen the correct version.

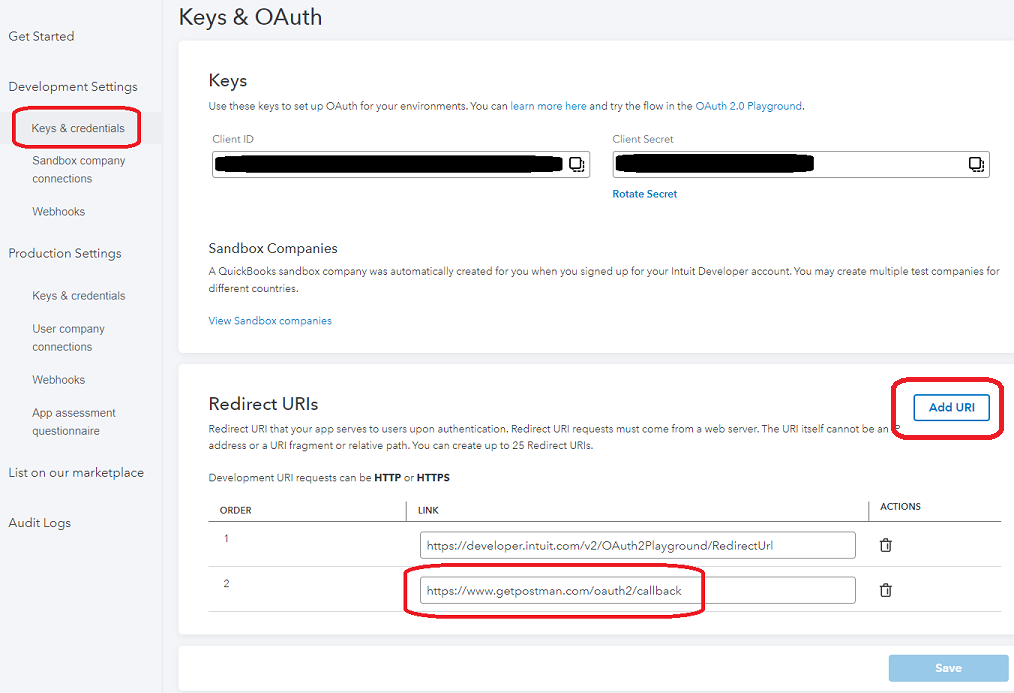
Intuit Redirect URI
When you try to trade an Authorization Code for an Access Token, that token is not returned in the response. The Intuit servers will send the Access Token and Refresh Token to a predetermined URL that you specify in your application setup. This provides an additional layer of security because you specify the callback URL when you ask for the Access Token, and that URL must match exactly the URL that is registered for the app, and Intuit will only send the Access Token to the predetermined URI.
Normally you would setup a dedicated URL endpoint just for this incoming call from Intuit. However, while using Postman, we do not have to setup that URL (and all the DNS that goes with it) because Postman provides us with an endpoint to use:
https://www.getpostman.com/oauth2/callback
To set this up go to your QuickBooks Sandbox Dashboard. If you have multiple apps defined, you may need to choose one to go to the Dashboard. Once on the Dashboard, navigate to the Keys and Credentials tab. Click the Add URI button and paste in the link above.
Setup Postman
Now we are finally ready to update postman. Start Postman, downloading first if necessary from here.
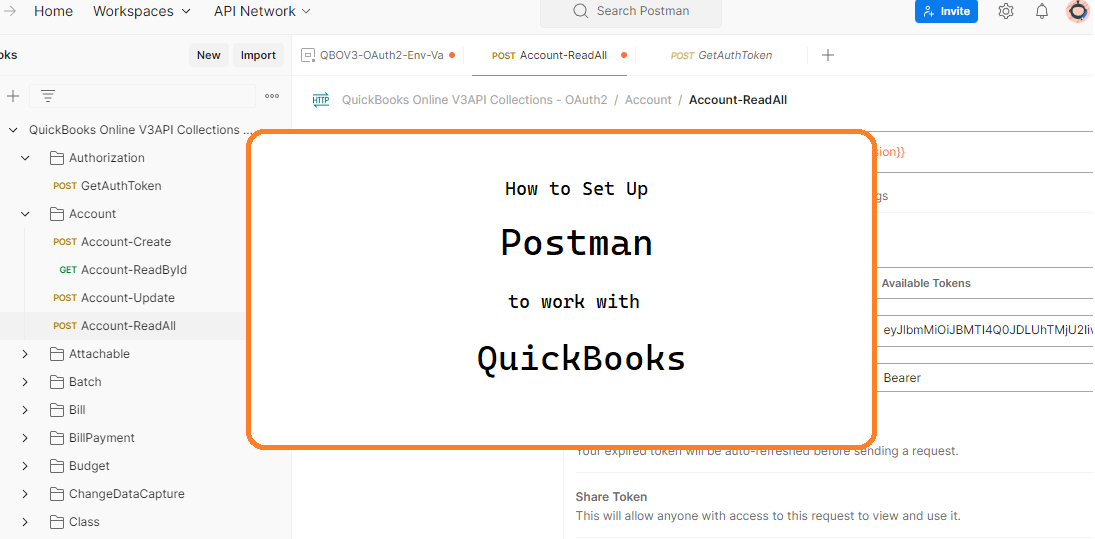
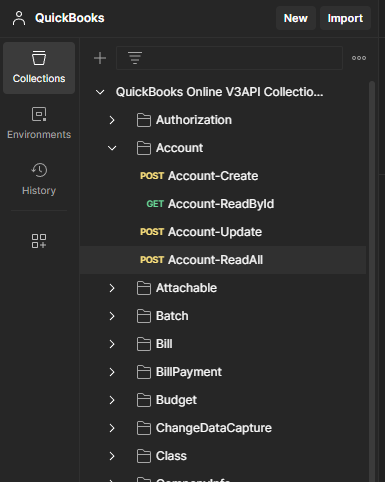
Intuit publishes a large list of Postman queries you can take advantage of by importing them into Postman. To download these go here. This will create a workspace in Postman called QuickBooks. Navigate there in Postman and you should see something similar to the image on the right.
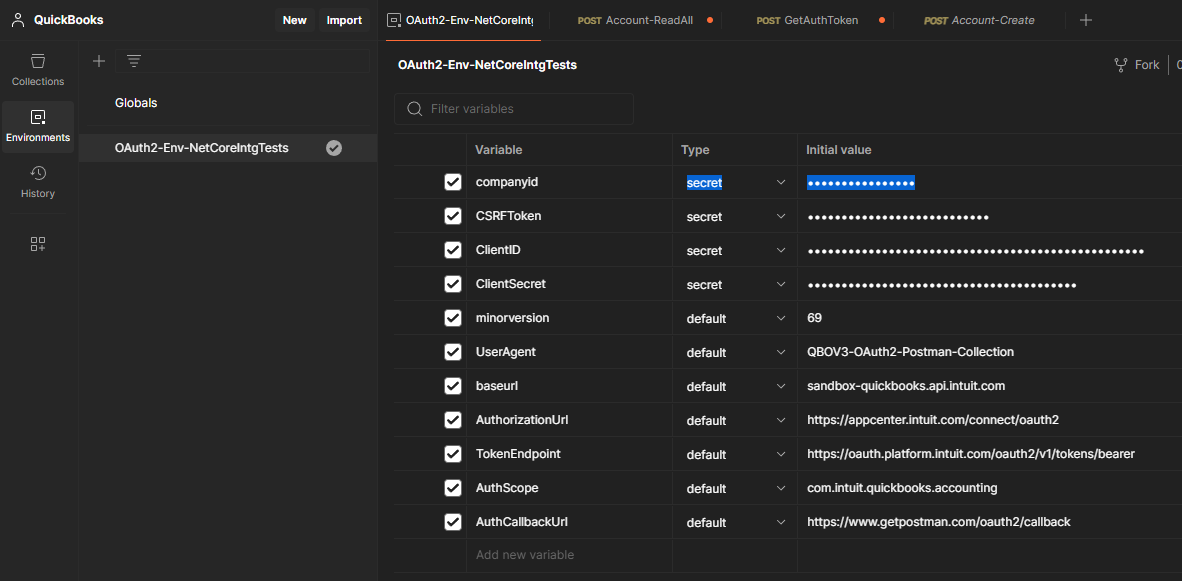
Postman is easiest to use if you declare variables for all the important information you have collected. Go to the Environments tab on the left side, select the environment variables sub-tab, and you will see a list of variables. Edit these as appropriate with the information you’ve collected. When you are done it should look like the image to the right. You can add any missing variables by typing them in at the bottom.
One thing to note is the AuthorizationCode is not in the list. I find that expires so quickly that putting it in a variable just complicates the process so we will specify that in the API call later.
The CSRF token is used to prevent Cross-Site Request Forgery attacks. It can be any unique string so I like to use a GUID. You can read more about it here at the bottom of the page.
The AuthCallbackUrl must match the one you set up in Intuit earlier.
What was called “companyid” is now called the RealmID, so put your RealmID here.
UserAgent can be any string, so put your application name in there or just leave it as the default.
Keep in mind that these values combine identifiers for the App you are using, and the target company. You cannot use these settings to access the data from a different QB company.
Setup Postman Authorization
We are almost ready to issue some queries, but first we need to setup the Postman authorization.
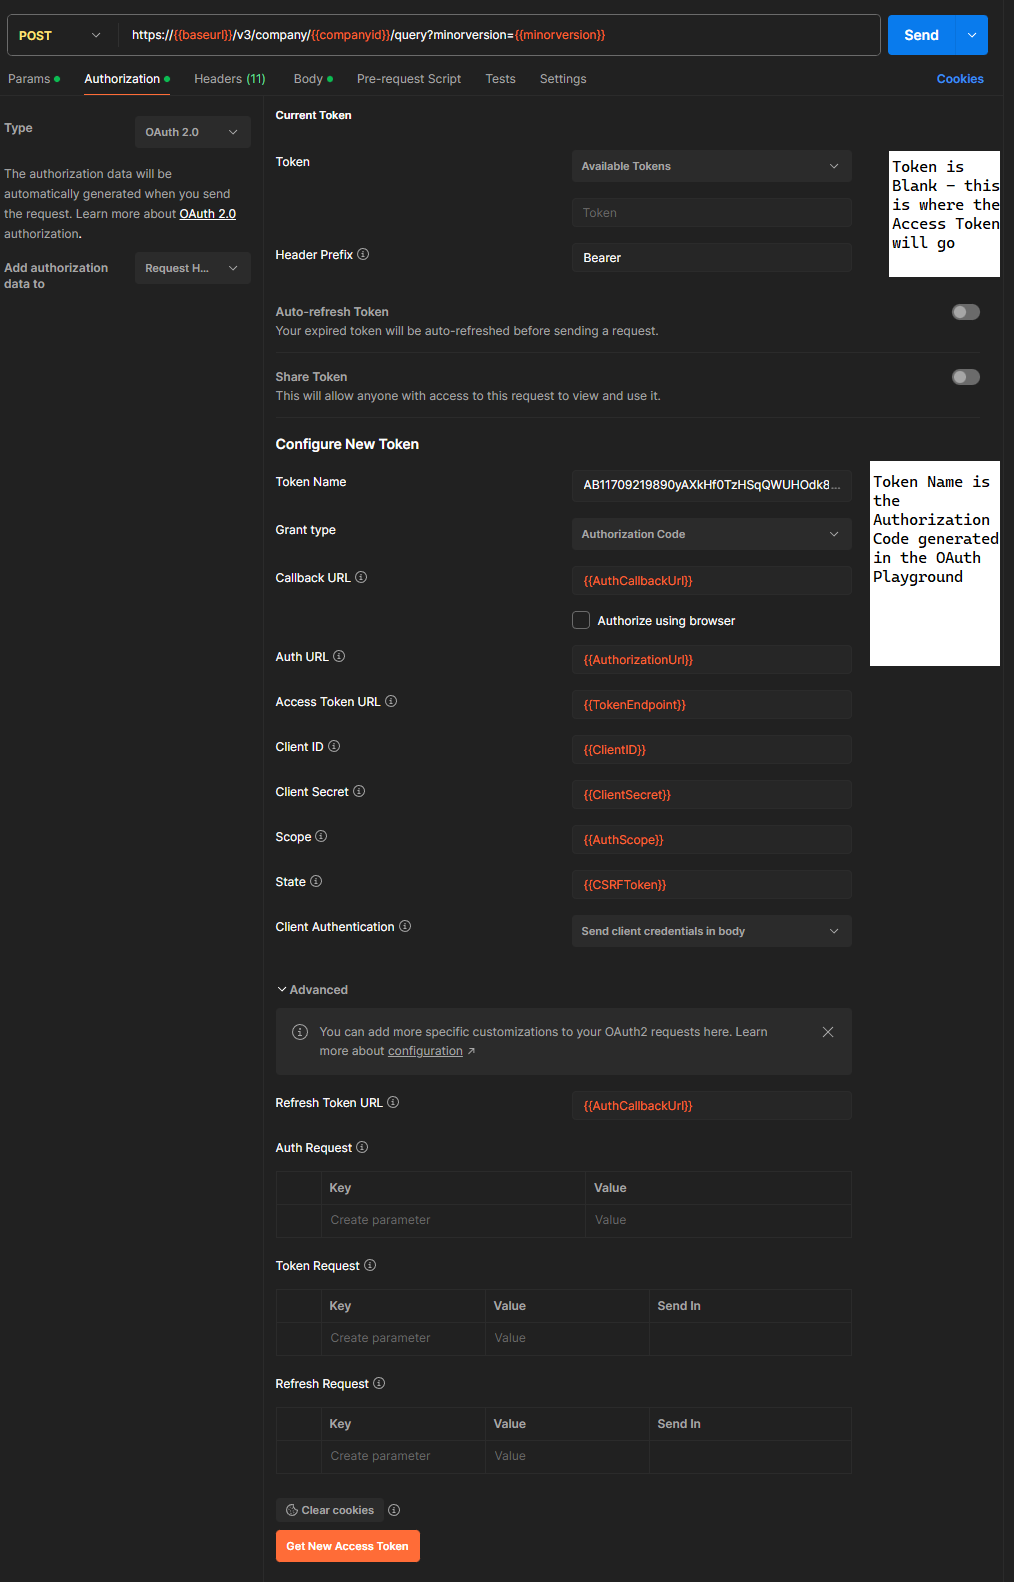
To illustrate, let’s try to get a list of QuickBooks accounts. Go to the Collections tab on the left of Postman, then the Account ReadAll query, and finally choose the Authorization tab.
Much of this information will already be filled out using variables. Note that Postman uses two curly braces {{ }} around variable names.
Double check all of the environment variables to make sure they are correct – especially the Authorization Code. Since it is only valid for 5 minutes it is a frequent cause of failure when getting the initial Access Token and Refresh Token.
Your Postman screen should look like the one to the right. Note that the Available Tokens combo box is empty, and the Token text box below it is also empty. This is where the Access Token will go once it is retrieved from Intuit.
Until you have authorized the app the first time, the Auto-refresh Token box cannot be turned on. After the first auth, it will automatically be checked.
Make sure the Client Authentication is “Send client credentials in body”.
Now press the “Get New Access Token” button at the bottom of the screen.

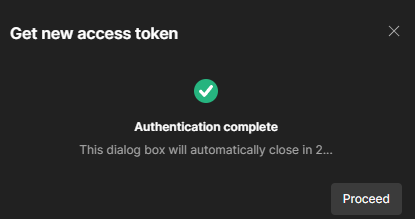
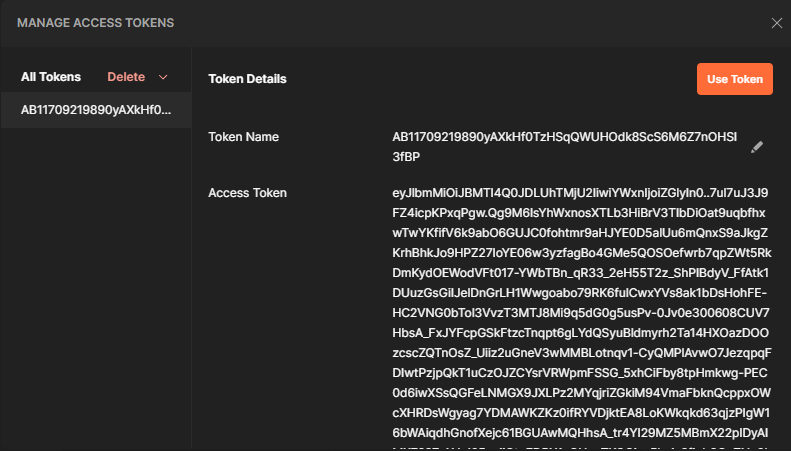
Hopefully you will see the Success message shown at the right. If so, press “Proceed” and you will see the Use Token dialog. Press the button and your Access Token is setup. You can see the Access Token in Postman, and the Auto-Refresh is selected.
Account Query
Now that our authorization is all setup, we are ready to start querying the Intuit API for real.
In the same tab you are in (with the Access Token in it), click the Send button. This will use the Access Token you just generated to query the API and return all the accounts in the company. You can see the JSON response at the bottom of the screen.
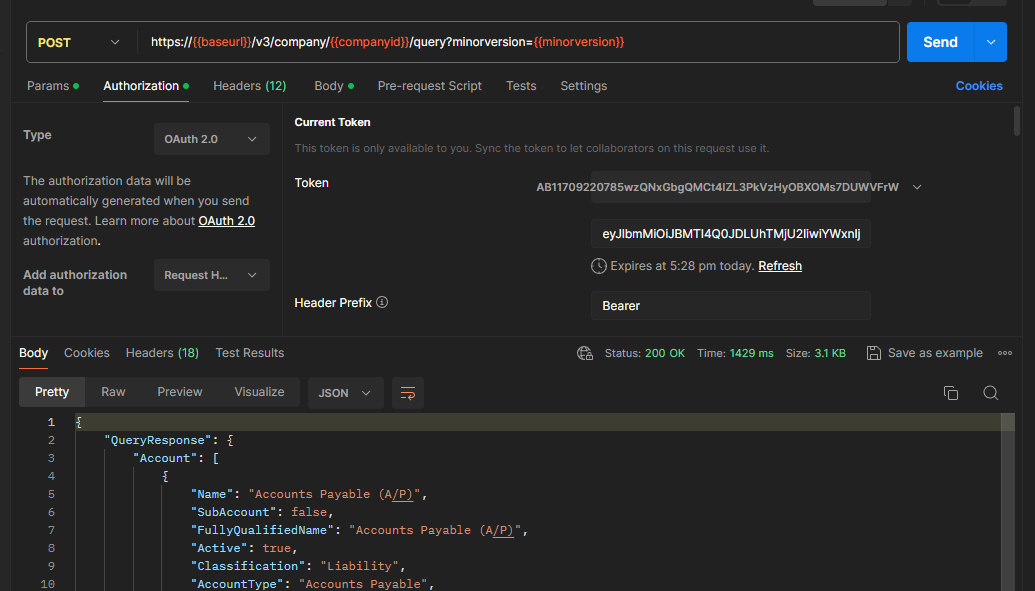
And That’s It! You can now issue queries against the Intuit API using Postman, and see the JSON response come back. Remember in the Collections tab at the top you have many pre-written queries you can use instead of trying to create your own. These are a great learning tool when getting started with the QuickBooks API.
Debugging Hints
This process takes a lot of setup, so the chances are higher than normal that something will go wrong.
If you get any error during the first authorization, the first thing to check is that all the variables are correct and the Authorization Code is still valid.
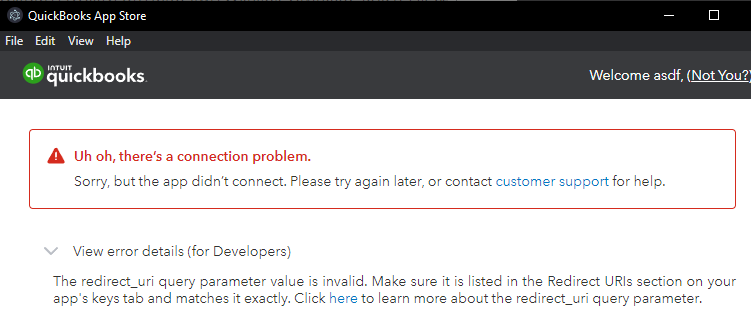
If you get an error like the one on the right, it probably means you did not configure the callback url properly in your Intuit App. Review the section above on Intuit Redirect RI, then double check that it is set correctly in the Intuit settings and in the environment variables:
https://www.getpostman.com/oauth2/callback